

As a guitar player, I can’t help myself from collecting gear. It’s a sickness for which there is no cure. I’ve got a lot of guitars, amps, and pedals lying around the house, but once I started the Pellegrini Guitar YouTube channel, I knew I was going to be making a bunch of demo videos, and I needed the perfect pedalboard to use during said demos.
As a self-proclaimed “guitar nerd,” I have always enjoyed wiring up different configurations of effects pedals. I currently own a large pedalboard (the one we’ll be looking at in this article) and a small one that only holds four or five pedals. I frequently like to reconfigure them based on what I’m into playing or listening to at the moment. However, I’m so happy with this new setup on my large pedalboard that I don’t expect it to change for a while. To me, this is the ultimate setup for recording guitar demos. Basically, anything I might need to do during a demo is only a tap of the foot away. Let’s dig in!

Disclaimer – these pedals are in regular use and are therefore covered in dust and cat hair. These are not professional photos of brand-new shiny products. These all have a little wear and tear on them, which is how it should be. I’ll provide links to each product so you can learn more about them and see nicer photos if you wish.
Board and Power Supply
Before we get into details about each pedal on the board, let’s talk a bit about the board itself and the power supply bringing them to life. The board I’m using is a PedalTrain Novo 24 with the tour case. As you can tell, it’s a relatively large pedalboard with room for at least nine pedals. One thing I love about this pedalboard is its combination of strength and low weight.
The board is very light and easy to carry without anything attached to it, yet it’s so rigid and well-built. Another thing I love about this pedalboard is its heavy-duty touring case. This thing looks like it’s ready for a world tour… or three.
I use Velcro strips on my pedalboards and on the backs of my pedals, but my power supply, which is a Voodoo Labs Pedal Power 2 Plus, is connected to the underside of the board via a few tie wraps. This particular power supply provides high-quality and reliable power for eight pedals, plus it has a regular power outlet attached to it, allowing you to connect another pedal if you wish. And boy, do I!
Okay, now let’s start digging into each of the pedals. I’m going to list them in the order I have them set up within my signal chain.
TC Electronic Poly Tune 3 Noir
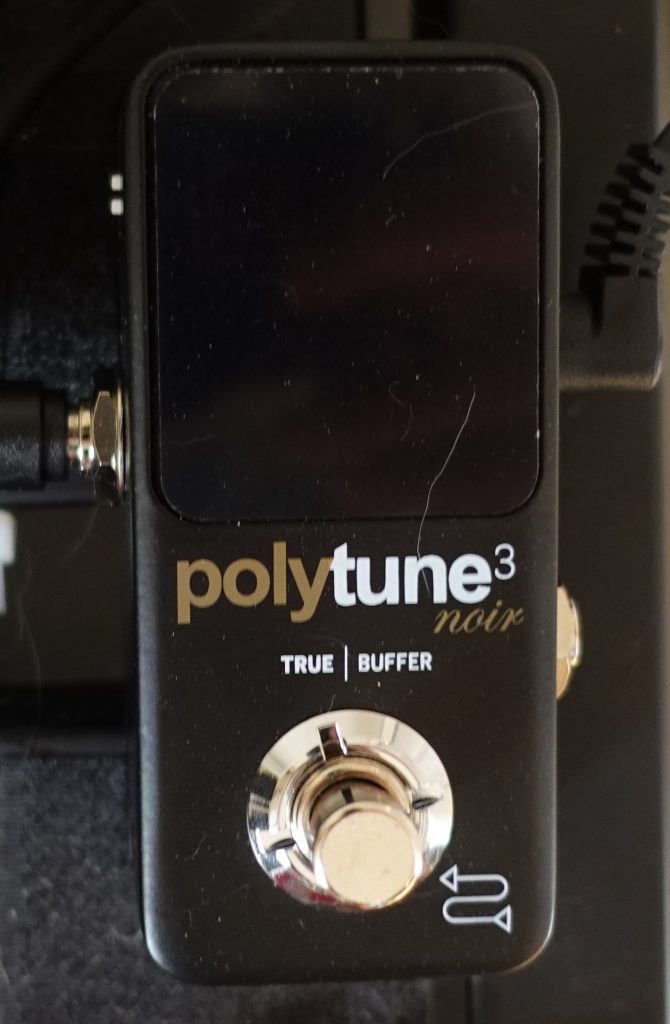
This is the first pedal in my signal chain, and it’s very common to have a tuner pedal at the beginning of your board. The idea is to get the purest signal directly from your guitar into the tuner with no interference.
Obviously, you don’t want to be out of tune when recording your demo, and this little thing is the perfect solution. It’s small, easy to read, and contains an optional buffer; you can run it in “always on” mode or hit the foot switch to mute the rest of your signal.
The “poly tune” aspect of it is cool, but honestly, I don’t make much use of it. The idea is that you can strum all of your open strings at once, and the tuner will show you which strings are in tune and out of tune. It’s handy if you need to quickly know if any string is out of tune, but when it comes to tuning each string, I prefer doing them individually in order to get the greatest accuracy from the tuner.
The addition of the optional circuit buffer is a nice touch, and I think the “noir” model looks super cool.
Boss NS-2 Noise Suppressor
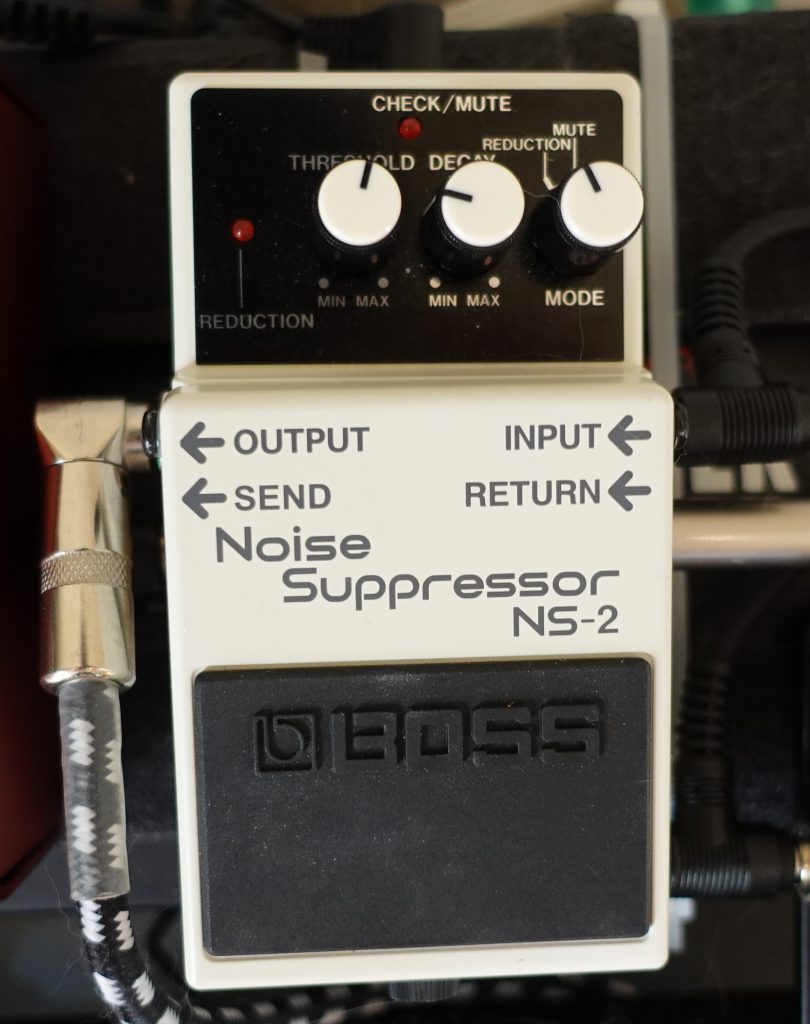
I don’t know why it took me so long to add the Boss NS-2 Noise Suppressor to my signal chain, but I can’t say enough about how well this thing works and what a difference it makes to my sound. The idea of a noise suppressor is to cut out unwanted noise and hum from your signal without altering your natural tone.
I first heard about this pedal when reading Yngwie J. Malmsteen’s autobiography, “Relentless.” As one of the world’s most renowned Fender Stratocaster players, Yngwie needed a solution for the 60-cycle hum commonly associated with single coil pickups. He talked in his book about how much he liked this pedal, so I decided to get one based on that recommendation alone.
I’m really happy I did, too, because it does a fantastic job. My signal is dead quiet with this thing engaged, assuming I’m not playing. I can still play softly, though, without my signal getting suppressed.
It took me a minute to understand all the ins and outs of the pedal. The idea when hooking this thing up to your pedal chain is to put it in front of any overdrive, fuzz, or distortion pedals but to connect those types of pedals through the pedal’s send and return jacks.
In my case, the tuner’s output connects to the noise suppressor’s input, then my compressor, overdrive, and fuzz pedal are all connected via the noise suppressor’s send jack. Then, the output of the final overdrive pedal is connected to the return of the noise suppressor. This way protects your overdrive and fuzz sounds from getting suppressed by the noise suppressor.
Finally, the output of the noise suppressor is connected to the first non-overdrive non-fuzz pedal in my signal chain, which in my case, is the TC Electronic Subnup Octaver. It may sound a little complicated, but to simplify things, think about the effects loop in a guitar amplifier. This is basically the same thing, except it’s a loop for your overdrive, fuzz, and distortion pedals.
If you’re a single-coil player, you really need one of these things in your arsenal. Even if you’re a humbucker player, it could still be very valuable for those who like to play with high levels of gain. If it’s good enough for Yngwie…
Strymon Compadre
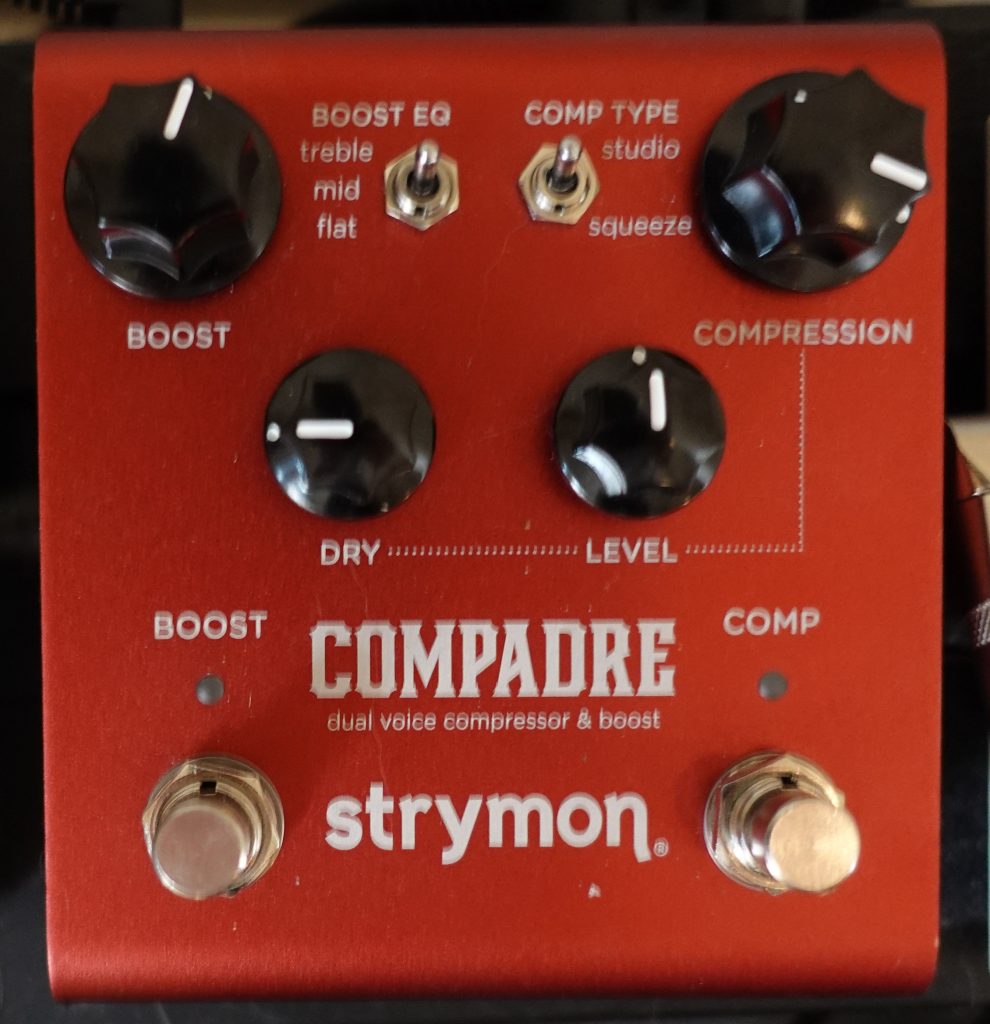
I call this thing my secret weapon. It just makes your tone sound better, for lack of a better term. The best-sounding compressor I’ve ever heard is on the pedal’s right side. There are two settings; one for studio-style rack-mounted tube compression and another for the heavier type of compression commonly associated with guitar compression pedals.
I tend to keep it on the studio setting, with the compression level set to about 3/4. If you’re a country player or just really like heavy amounts of compression, you’ll probably want to use the other mode, but the studio mode is standard for me, and I leave it on always.
The pedal’s left side is a boost, and once again, there are a few different settings to choose from. There’s a treble boost, which is what I’ve been using lately, plus a mid boost and a flat boost. Each one has its own EQ characteristics, but I find that the treble boost works best with the overdrive pedal I’m using.
This is my first time owning a Strymon pedal, but not the first one I have played. I can’t say enough about the quality of their pedals. You could make life very easy on yourself by only purchasing Strymon pedals. Yes, they’re a bit more expensive than most pedals, but the tones they produce and their build quality are second to none.
Wampler Velvet Fuzz
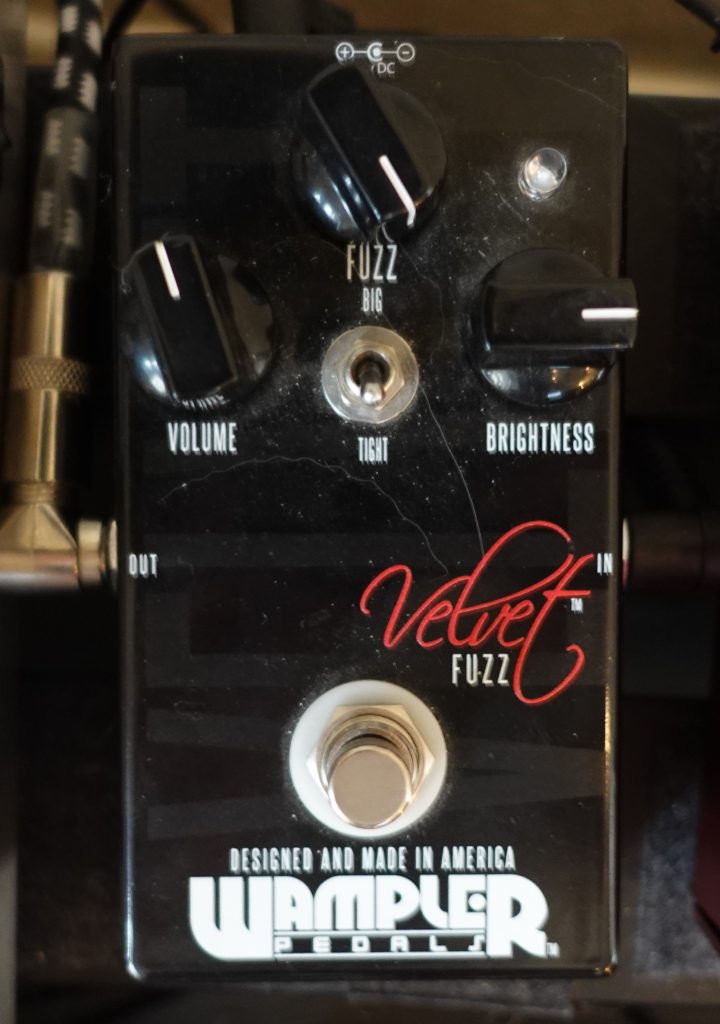
The Wampler Velvet Fuzz is the best sound fuzz pedal I’ve ever played. Period. It’s not the thickest or heaviest sounding fuzz I’ve heard, so if you’re going for that wooly sound, you’d probably be better off with something like a Wampler Fuzztration. This one has more of a classic vibe to it, and in true Brian Wampler fashion, it contains a toggle switch allowing you to switch between two modes.
The top end of the switch is the “Big” mode, but I always think of it as the Jimi Hendrix mode. This one sounds like a Fuzz Face going straight into a Marshall Plexi stack. It’s got angry, almost exploding, characteristic to it. I don’t use this mode too often, but anytime I want to do something like Purple Haze, I would use the Big mode on this pedal.
The bottom end of the switch is the “Tight” mode, and this is the one I use most often. To me, this one sounds more like David Gilmour and Eric Johnson. The fuzz it produces is so smooth and evenly saturated. I love using this setting for solos and other lead work because it stands out beautifully in the mix.
So, if you’re looking for massive gain, this probably won’t be the best fit, but if you want a beautiful vintage-voiced fuzz tone that makes nearly any solo sound better, you really need to check out the Wampler Velvet Fuzz.
Mesa Boogie V-Twin

The Mesa Boogie V-Twin is my all-time favorite overdrive pedal, but the funny thing is, it’s not just an overdrive pedal. In fact, you could get a ton of use out of this thing without ever using it as an overdrive pedal. Allow me to explain.
According to Mesa Boogie, this pedal, which has long been out of production by now, is a tube preamp pedal inspired by the Dual Rectifier amp series. The metal grate at the top of the pedal is protecting two 12AX7 preamp tubes! Most people talk about tubes in their amps, but how many have tubes in any of their pedals!? In addition to that, I love how tough this thing looks with all that diamond plated metal. You can clearly see the Rectifier lineage based on that design choice, and it’s built like a tank so you don’t have to worry too much about damaging it.
As I mentioned at the beginning of this post, my Voodoo Labs Pedal Power 2 Plus contains eight standard guitar pedal power cables, but it also has a normal wall outlet built into it. This is perfect for me because my V-Twin requires more power than your standard guitar pedal. It comes with a nice heavy duty power supply, which I have connected to the wall outlet on the power supply.
The versatility of the Mesa Boogie V-Twin is incredible. If you like, you can use it as a preamp, meaning you can connect it directly to a power amp, then connect that to a speaker, and voila, you have a guitar amplifier. You can also use it for recording because it has a direct out that’s meant to go to a mixing board. I’ve used it this way for guitar and bass and couldn’t believe what a pure and clean tube tone I was getting straight into my DAW (Digital Audio Workstation).
The V-Twin also has a headphones output, so it’s perfect for quiet practice sessions. I have used it many times as an amp rather than an overdrive pedal, connected the rest of my pedals to it, and then plugged headphones into the V-Twin.
All that said, these days, I tend to use it as an overdrive pedal, and boy, does it sound good! There are two footswitches on the pedal, along with three modes: clean, blues, and high gain. The blues setting might just be my favorite, but they all sound amazing. Combining that blues setting with a nice spring reverb is all I need to be happy. It has the perfect amount of overdrive without losing note clarity.
The high-gain setting is also beautiful if you need to kick it up a notch. Due to the extra gain stage, there’s a lot more saturation and natural compression going on with this setting. Depending on what kind of guitar you’re playing, it can sound a little dark, but I’ve found that the treble boost setting from the Strymon Compadre is the perfect compliment.
It’s too bad Mesa doesn’t make these things anymore. I had one originally back in the 90s, but I foolishly sold it like so many other quality pieces of gear. A few years ago, I decided I needed to have one once again and was able to find it on Reverb. They are still out there for sale if you’re looking, but I wouldn’t waste too much time. The price seems to be rising because people are starting to realize how awesome they are.
TC Electronic Subnup Octaver
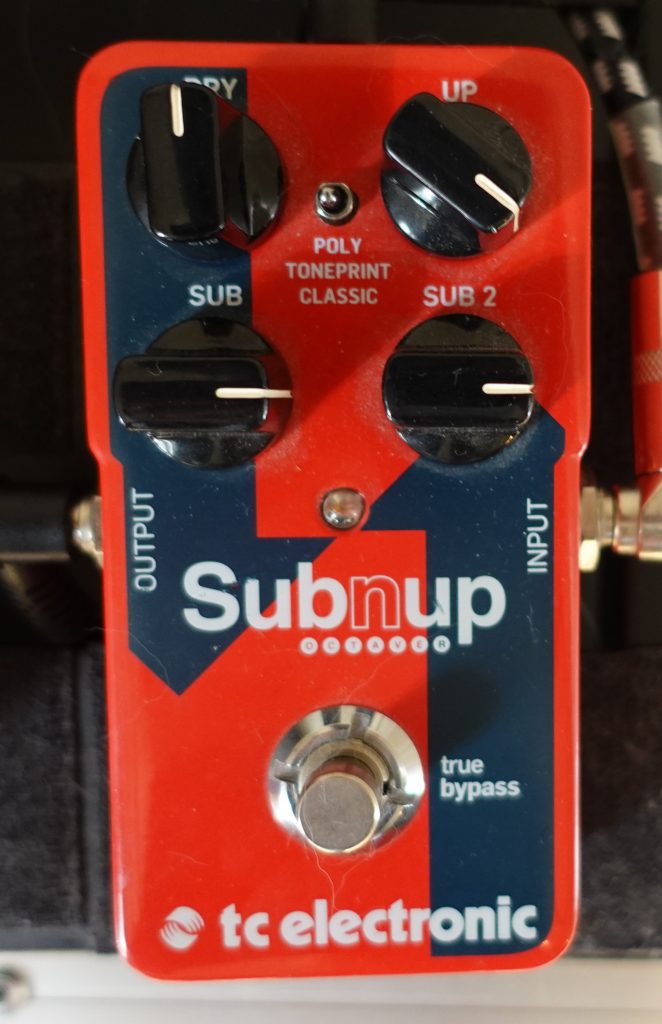
The TC Electronic Subnup Octaver is probably the most unique pedal on this board, although I have to admit, I probably use it the least of these pedals as well. As the name implies, this is an octave pedal, meaning it can transpose the notes you’re playing up or down in octaves.
This isn’t the only octave pedal in my collection; I also own an Earthquaker Devices Tentacle Analog Octave Up pedal, but the TC Electronic Subnup Octaver is far more versatile. I will admit that if you’re only comparing the octave-up functionality of the TC Electronic pedal against the Tentacle, the Tentacle sounds a little better. Pairing the Tentacle with my Wampler Velvet Fuzz is the perfect gateway to Jimi Hendrix’s tone. Listen to the solo on “Purple Haze,” and you’ll know what I mean.
That being said, I love the versatility I get from the TC Electronic Subnup Octaver. There are four knobs: dry signal, octave up, sub 1, and sub 2. It also has a toggle switch allowing you to select one of three modes: Poly, TonePrint, and Classic.
Playing with the four knobs gives you many options to incorporate different octaves into your sound. You can get extremely low octaves using the two “Sub” knobs or come up with something more well-balanced by setting each knob to about noon on the dial.
Once you start mixing in the options with the toggle switch, the options are practically endless. The “Poly” mode is basically TC Electronic’s take on a modern octave pedal, while the “Classic” mode has more of a vintage sound. They’re both great, but the one that I use the most is the “Toneprint” setting.
If you’re not familiar with the “Toneprint” mode, it’s available on many of TC Electronic’s pedals. It’s actually a very modern and smart take on adding versatility to your guitar effects pedals. You need to download the Toneprint app onto your smartphone, and then you’ll be able to browse a large assortment of Toneprint settings made by various guitarists.
When you find a setting that you’re interested in trying out, you have to pair it with the pedal. To do so, your guitar needs to be connected to the pedal, and the pedal needs a power source (battery or wall outlet). When you hold down the footswitch on the pedal for a few seconds, the light will begin to blink. This tells you that the pedal is ready to have a new Toneprint installed.
Continue holding the foot pedal down, place your phone very close to the pickups on your guitar, and press the pairing button in the Toneprint app on your phone. This will send a signal through your pickups and the rest of your guitar’s electric system, through your cable, and into the effects pedal.
If everything worked as intended, the app on your phone will show a success message, and the pedal light will stop blinking. At that point, you have a new Toneprint setting on your pedal to try out! If you don’t like the sound from this Toneprint setting, just find another one and follow those installation steps again.
For my TC Electronic Subnup Octaver, the Toneprint setting I have installed makes it sound like an organ. All you have to do is play a single note, and you’ll be amazed at all of the tones created by the pedal. Playing a chord doesn’t work very well because there are too many notes trying to sound off at once, but you can play a series of single notes, and you won’t believe how much it sounds like a real organ.
Again, I don’t use this pedal too frequently, but it can come in really handy for the right situation. Sometimes I like to record an organ backing track with my looper pedal (more on that in a bit) and my Octaver pedal, then solo over the top of it. It’s also really handy for recording songs when you want an organ or octave sound. It’s a very fun pedal to play with, and you can pick one up for about a hundred dollars, so the price is reasonable. I highly recommend checking it out!
Wampler Terraform

I’ve been a fan of guitar modulation pedals for just about as long as I’ve been playing guitar. I have a variety of phaser, flanger, chorus, vibe, and tremolo pedals, but the problem is a pedal per modulation effect takes up too much space on my pedalboard and too many of my power cables. Enter the Wampler Terraform.
The Terraform may not be the first multi-function guitar modulation pedal. After all, the Strymon Mobius and the Boss MD-500 are very similar products that came to market well before Terraform. However, each of these pedals is unique in its own way, and the fact that the Terraform provided vibe, phaser, flanger, rotary, chorus, dimension chorus, tremolo, AND harmonic tremolo was the main selling point for me. I don’t make much use of the other settings (auto-wah, envelope filter, and auto-swell), but the rest of these modulation effects are in regular rotation.
You can assign up to eight presets, so it’s easy to jump between effects, and you have the option of running it mono or stereo. You can also connect an external expression pedal to modify the rate of the effect you’re using on the fly. Another handy thing about the Terraform is the manual that comes with it. There are a few different recommended settings for each effect, making it easy to dial in some classic sounds. You might want a slow bluesy harmonic tremolo, a 90s grunge chorus, or EVH’s phaser sound from Eruption. In each case, plus many more, it’s so easy to dial in the sound you want, save it to a preset, and move on. Another nice touch with the Wampler Terraform is that it will run with 9-volt and 18-volt power supplies.
If you’re looking for a single pedal that gives you every modulation effect you could ever want or need, I think the Wampler Terraform, as well as the other two I listed earlier, are worth your consideration.
Keeley Caverns Delay + Reverb V2

The Keeley Caverns is another two-for-one guitar effects pedal that I can hardly live without. In fact, I think I could argue that if you already have a good amp with at least two channels (one clean and one distorted) and an effects loop, this pedal is all you really need, assuming you have a tuner handy.
For me, when it comes to building the ultimate pedalboard for guitar demos, I have limited space and limited power supply plugs, so these types of pedals that give you more than one effect are a lifesaver.
In this case, as the name implies, the Keeley Caverns provides you with 3 types of reverb (shimmer, spring, and modulated), along with a very nice sounding delay which reminds me of a tape delay. On the reverb side of things, I tend to use the spring reverb setting most frequently, but the shimmer and modulated reverb can come in handy for certain effects.
One thing that’s really interesting about the reverb in this pedal is that even if you’re not on the modulated setting, you can still incorporate modulation into your spring reverb sound via the Rate knob. The other reverb knobs on the pedal are for Blend, Warmth, and Decay. I find it to be a beautiful sounding reverb with plenty of options to tweak the sound.
While there is only one type of delay in this pedal, it still has a modulation toggle switch, allowing you to switch between Off, Deep, and Light. I usually leave it on the Light setting, but if you really like that effect you can also go with the Deep setting. The Rate knob is what you use to specify the speed of modulation, then the other three knobs are pretty standard for a delay pedal: Time, Repeats, and Blend.
While you can make a strong case that modulation and octave pedals aren’t all that necessary, I think having reverb for your clean sound and delay for your high gain solos are a must. Getting both of those essential effects in a single pedal makes the Keeley Caverns a must-have for me!
TC Electronic Ditto X2 Looper

The TC Electronic Ditto X2 Looper is one of several looping pedals offered by TC Electronic. If you’re not familiar with a looping pedal, the basic idea is that it allows you to record yourself playing something, then once you end the recording, it loops endlessly, allowing you to solo over the background music, or add more layers to the loop.
Since this is one of the nicer models they make in this range, the Ditto X2 Looper contains a few extra features that set it apart. First, as you can see in the photo, it has two foot switches. This makes it easier to record loops, and the FX footswitch on the right has a little toggle switch that allows you to select one of three different functions: Reverse, 1/2 Speed, and Stop.
Engaging the Reverse mode will cause the pedal to play whatever loop you have recorded in reverse. The 1/2 Speed mode slows your recorded loop down to half speed, and the Stop mode (which is what I usually use) simply stops the loop from playing.
There is also a small toggle switch on the left side, which is directly related to the Loop footswitch. The top option is what I normally use; it just allows the pedal to function like a normal looping pedal, meaning it will loop whatever you record into the pedal. The bottom mode, however, is a really nice touch in my opinion; it allows you to upload a recorded track directly into the pedal, and then it will loop that track whenever the pedal is engaged. This can be really handy if you’re working on a particular song, or you if you need that particular track for a live performance.
While I wouldn’t consider a looping pedal to be a necessity for all guitar pedalboards, I think it’s a really nice addition to this pedalboard because the looper is really handy during demos. I’ve used it several times when recording a demo for YouTube, or when I play on Facebook Live.
Summary
I’m very happy with this pedalboard and expect to keep it setup this way for a long time. In my opinion, each of these pedals has a special quality, or that ‘it’ factor, making it worthy of a permanent place on my board. I still love setting up new pedalboards, but for my purposes in recording guitar demos, I don’t see how I could improve this board anymore without buying a bunch of new gear.
The temptation to buy new gear is always there, but I’ll be the first one to admit that it’s not the gear, or the guitar, that makes you sound good. It’s the practice! These are all fun toys to play with, and I hope you’ve enjoyed my descriptions of them, but all that really matters is that we’re picking up the guitar regularly and finding ways to improve.
With that said, I think it’s time for me to go practice! See you in the next article.


